
075582814553

Thermal paste plays a key role in maintaining the efficiency and longevity of heat-generating components like CPUs and GPUs in electronic devices. As devices become more powerful and compact, effective thermal management becomes increasingly significant. Thermal paste acts as a bridge between the component and the heat sink, filling tiny gaps to ensure optimal heat transfer and prevent overheating.
This article delves into the purpose and function of thermal paste, the different types available, application methods, best practices, and environmental factors. Understanding these aspects helps users improve their thermal management strategies, ensuring their electronic devices run at peak performance and reliability.
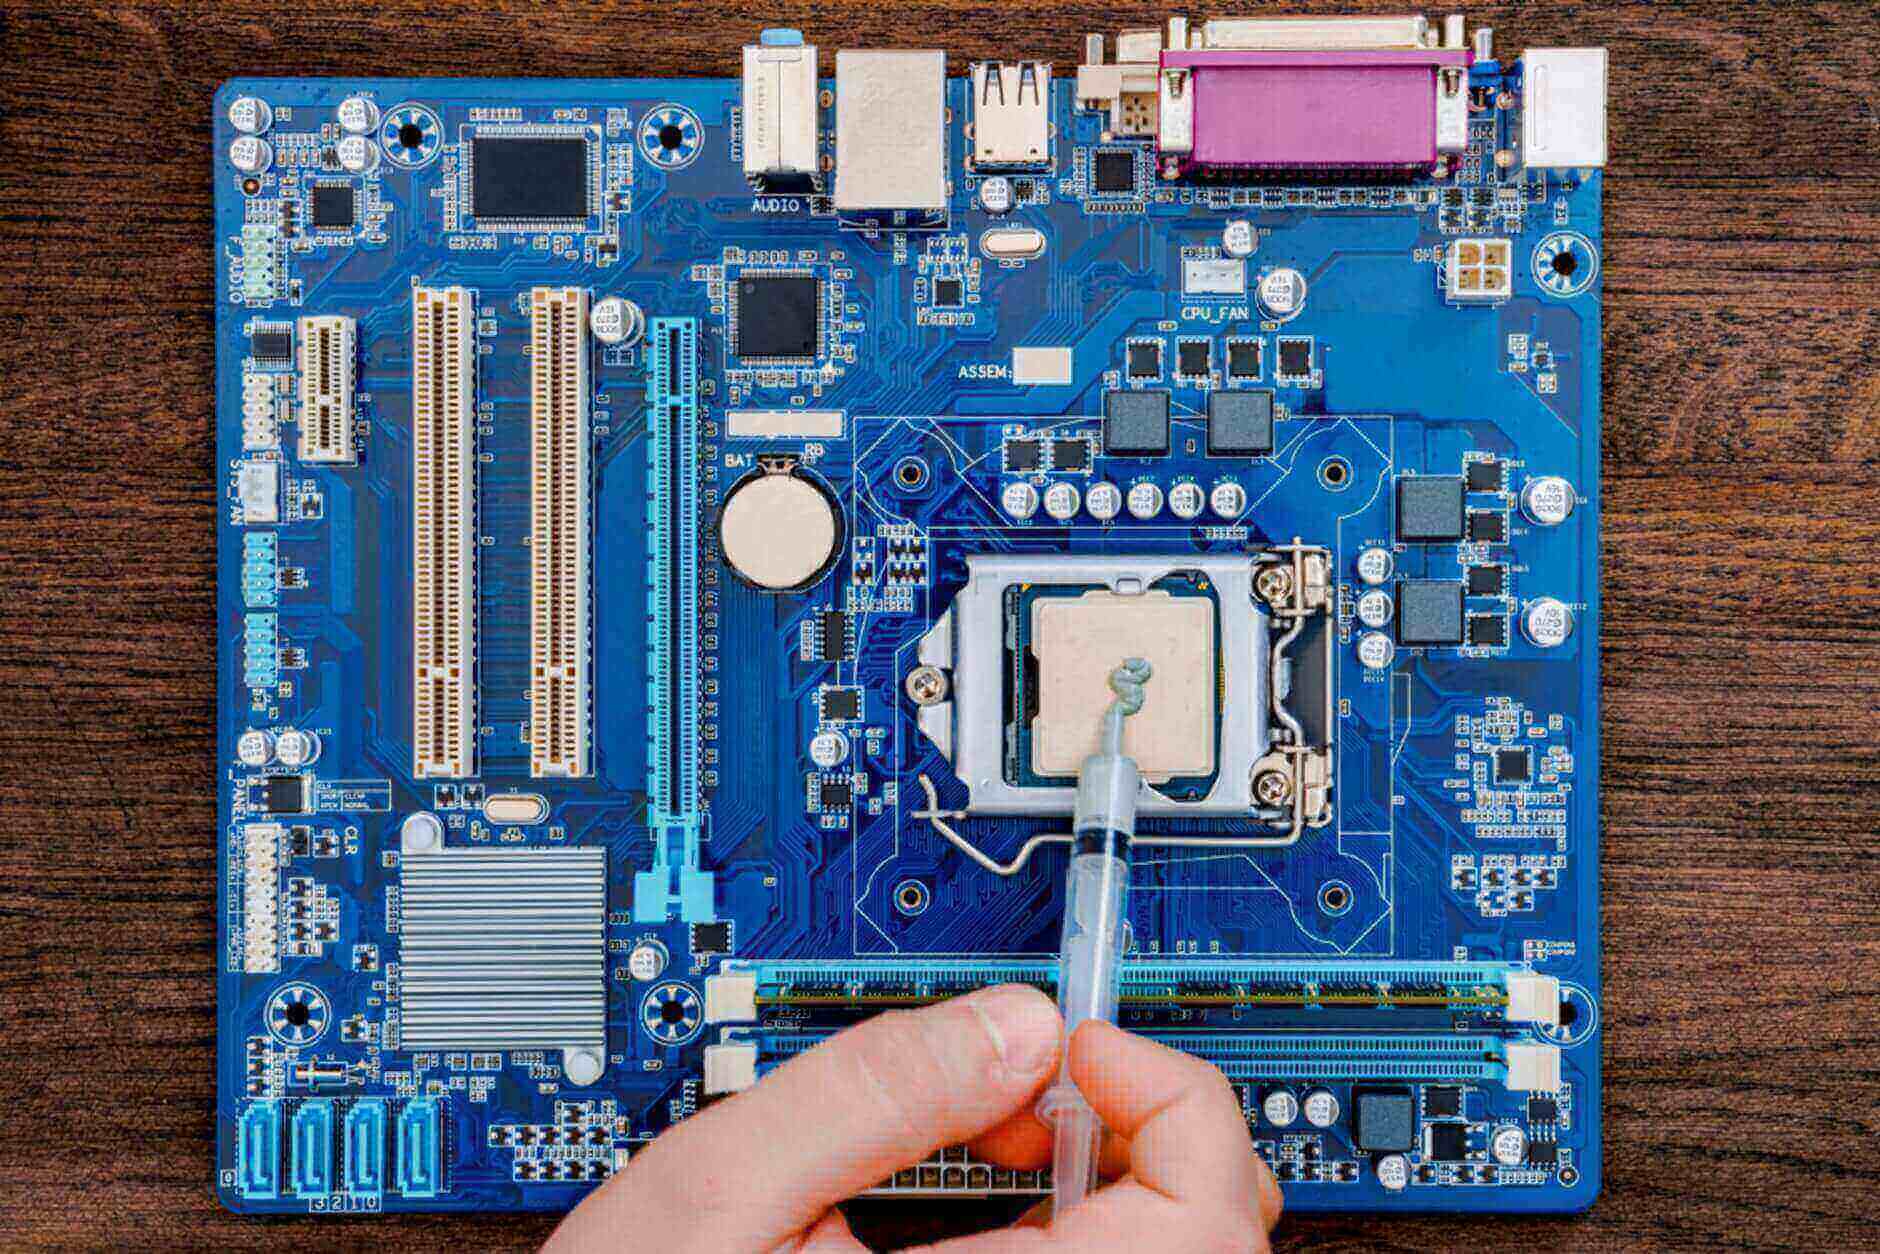
Figure 1: Thermal Paste
Thermal paste is key for the efficient operation and longevity of electronic components. Its primary function is to enhance thermal conductivity between a heat-generating component, such as a CPU or GPU, and a heat sink. By filling microscopic gaps and imperfections on these surfaces, thermal paste ensures effective heat transfer, maintaining optimal performance and preventing overheating. Understanding the role of thermal paste is important for anyone aiming to optimize their electronic devices' performance and durability.
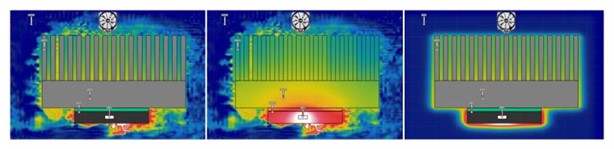
Figure 2: Heat Dissipation Thermal Simulation
Thermal paste significantly improves heat transfer in electronic systems. Its high thermal conductivity compared to air allows it to bridge the gap between a component and its heat sink, ensuring that heat is efficiently conducted away from the component. This is necessary because air, with its poor thermal conductivity, cannot achieve the same level of heat transfer. Even polished surfaces of electronic components and heat sinks have microscopic imperfections and air gaps. Left unfilled, these gaps can hinder heat transfer, leading to inefficient cooling and potential overheating. Thermal paste fills these imperfections and gaps, creating a smooth, continuous path for heat transfer.
Thermal paste helps regulate the temperature of electronic components. Efficient heat transfer is required to maintain optimal performance, as overheating can lead to thermal throttling. Thermal throttling occurs when a component, like a CPU or GPU, reduces its performance to prevent heat damage. By ensuring consistent heat dissipation, thermal paste helps avoid this performance degradation. Excessive heat can cause long-term damage to electronic components, potentially leading to failures or reduced lifespan. Thermal paste promotes effective heat dissipation, protecting components from heat-induced damage.
The role of thermal paste extends to a wide range of electronic systems. CPUs and GPUs are among the most heat-intensive components in modern electronics, generating significant heat during operation. Efficient heat dissipation is key for maintaining their performance and preventing overheating. Thermal paste ensures that the heat generated is efficiently transferred to the heat sinks, maintaining the system's performance and stability. Beyond CPUs and GPUs, thermal paste is also used in other heat-generating components like power transistors, voltage regulators, and memory modules.
Thermal paste significantly enhances the reliability of electronic systems by ensuring consistent and efficient heat transfer. Systems with effective thermal management experience fewer crashes, longer component lifespans, and more stable performance over time. The consistent heat transfer provided by thermal paste contributes to overall system stability and reliability, preventing issues related to overheating and thermal stress. Applying thermal paste is straightforward, making it accessible for both professionals and hobbyists. Regular maintenance and reapplication of thermal paste can significantly extend component lifespan and maintain performance.
Thermal paste comes in various compositions, each designed for specific applications and performance needs. Understanding these types is key to selecting the right one for your electronic components. Here, we explore the main types: metal-based, ceramic-based, silicone-based, carbon-based, and liquid metal thermal pastes.

Figure 3: Different Types of Thermal Paste
Known for their high thermal conductivity, they are ideal for high-performance applications. These pastes typically contain fine metal particles such as silver or aluminum. The metal particles promote excellent heat transfer between components and heat sinks, significantly reducing thermal resistance. This type is often preferred by enthusiasts and professionals working on overclocking or high-end gaming systems. However, metal-based thermal pastes are electrically conductive, which can create a risk of short circuits if not applied correctly. Ensuring that thermal paste is only applied to the intended surface is key to avoiding potential damage. Although caution is required, the superior thermal conductivity offered by metal-based thermal pastes makes them a popular choice for demanding cooling applications.
Offer a balanced combination of performance and safety. These pastes contain ceramic particles such as zinc oxide or aluminum oxide, which provide moderate thermal conductivity. While ceramic-based thermal pastes are not as thermally conductive as metal-based pastes, they are not electrically conductive, eliminating the risk of short circuits. This makes them a safer choice for general-purpose use, especially in systems where ease of use and reliability are priorities. Ceramic-based thermal pastes are versatile and suitable for a wide range of electronic components, from CPUs and GPUs to power transistors and voltage regulators. They are also less prone to drying out over time, ensuring long-lasting performance. Ceramic-based thermal pastes are an excellent choice for users looking for a reliable thermal paste without the risks associated with metal-based thermal pastes.
One of the most commonly used types, as they are easy to apply and affordable. These thermal pastes contain silicone as the primary dielectric, combined with various fillers to enhance thermal conductivity. While their thermal performance is generally lower than that of metal- or ceramic-based thermal pastes, silicone-based thermal pastes are adequate for many standard applications, such as everyday computing and consumer electronics. Their non-conductive nature ensures safety during application, reducing the risk of short circuits. Silicone-based thermal pastes are also known for their flexibility and durability, maintaining performance over a wide temperature range. They are particularly useful in situations where frequent reapplication is required, as they are easy to remove and reapply. Silicone-based thermal pastes are very practical for users who need a cost-effective and user-friendly thermal paste for less demanding applications.
A new product on the market, they offer high thermal conductivity but without the electrical conductivity risks associated with metal-based thermal pastes. These pastes contain carbon particles, such as graphite or carbon nanotubes, which provide excellent thermal conductivity. Carbon-based thermal pastes are suitable for high-performance applications, including gaming systems, workstations, and overclocking setups. They offer a good balance between thermal conductivity and safety, making them an attractive option for users seeking performance and reliability. The unique properties of carbon particles also help improve the stability and lifespan of the thermal paste, ensuring consistent performance over time. While carbon-based thermal pastes may be more expensive than other types of thermal pastes, their superior thermal conductivity and non-conductivity make them a valuable investment for high-end systems that require optimal cooling.
Represent the pinnacle of thermal conductivity, with materials such as gallium or indium. These pastes offer unparalleled thermal performance, making them ideal for extreme overclocking and high-performance computing environments. Liquid metal pastes are highly conductive and can reduce thermal resistance to unparalleled levels, ensuring that heat is transferred from components to heat sinks with maximum efficiency. However, their electrical conductivity also presents significant risks. Any spillage could result in a short circuit, so extreme caution must be exercised during application. Additionally, liquid metal can react with aluminum and corrode the heat sink if incompatible materials are used. Therefore, it is key to ensure compatibility and follow a precise application procedure, which often involves the use of non-conductive barriers and meticulous cleaning. Despite these challenges, the superior thermal conductivity of liquid metal pastes makes them a top choice for users seeking the highest performance.
| Type | Composition | Thermal Conductivity | Pros | Cons |
Metal-Based Thermal Paste | Fine metal particles (e.g., silver, aluminum) | High | Excellent thermal performance, ideal for high-performance applications | Electrically conductive, risk of short circuits if misapplied |
| Ceramic-Based Thermal Paste | Ceramic particles (e.g., zinc oxide, aluminum oxide) | Moderate | Electrically non-conductive, safe for general use, reliable | Not as thermally conductive as metal-based pastes |
| Silicone-Based Thermal Paste | Silicone with various fillers | Low to Moderate | Easy to apply, affordable, flexible, durable | Lower thermal performance, frequent reapplication may be required |
| Carbon-Based Thermal Paste | Carbon particles (e.g., graphite, carbon nanotubes) | High | High performance, non-conductive, stable and long-lasting | More expensive, relatively new to the market |
| Liquid Metal Thermal Paste | Gallium or indium | Very High | Unmatched thermal performance, ideal for extreme overclocking and high-performance computing | Electrically conductive, risk of short circuits, can corrode aluminum heat sinks |
Chart 1: Types of Thermal Paste Different Characteristics
Thermal paste is important for maintaining effective heat transfer between electronic components and heat sinks. Over time, thermal paste degrades, which reduces its effectiveness and can lead to overheating and performance issues.
If your CPU, GPU, or other heat-generating component is running hotter than usual, this could be a sign that the thermal paste is no longer effective. Track component temperatures using hardware monitoring software such as HWMonitor, Core Temp, or MSI Afterburner. Compare current readings to baseline measurements taken when thermal paste was first applied. Significantly elevated temperatures could indicate that the thermal paste has degraded. Sustained high temperatures can lead to thermal throttling, where a component reduces its performance to prevent overheating. This can result in slower processing, lower game frame rates, and overall decreased system performance. Regularly monitoring temperature data can help detect these issues early and prevent potential damage.
Thermal throttling occurs when a component reduces its performance to prevent overheating. This self-protective measure can result in slower processing, lower game frame rates, and overall decreased system performance. If you notice that your system is performing poorly, frequently slowing down, or lagging during intensive tasks, thermal throttling could be due to thermal paste degradation. In gaming, you may see sudden drops in frames per second (FPS), while when processing tasks, you may experience slower compute times. Monitoring software can help correlate these performance drops with temperature spikes, confirming that the thermal paste is no longer effectively controlling heat.
Physical inspection of thermal paste can reveal signs of degradation. Over time, thermal paste can dry out, harden, or crack, losing its ability to fill the tiny gaps between components and heat sinks. To inspect thermal paste, first power down and unplug your system. Carefully remove the heat sink from the components, being gentle to avoid damaging the CPU or GPU. Visually inspect the thermal paste. Look for signs of drying, cracking, or hardening. If the thermal paste looks chalky, brittle, or flaky, it has most likely degraded and needs to be replaced. Fresh thermal paste should be smooth and slightly tacky. This simple inspection can quickly indicate if the thermal paste needs to be reapplied to ensure effective heat transfer. Regular visual inspections during maintenance can help identify early signs of degradation.
Your system is working harder to cool components. Fans may run more often and at higher speeds in an attempt to dissipate heat that the degraded thermal paste can no longer effectively manage. Watch for changes in fan behavior. If your fans are noisier and spinning at higher speeds, it could be a sign that the thermal paste is no longer providing adequate thermal conductivity. Software such as SpeedFan can help monitor fan speeds and correlate them with temperature readings. Increased fan activity not only indicates possible thermal paste degradation, but it can also lead to increased noise levels, which can be annoying during operation.
Degraded thermal paste can lead to system instability, including random crashes, freezes, and unexpected reboots. Overheating caused by degraded thermal paste can disrupt normal operation and lead to hardware failure. If your system is frequently experiencing instability, it could be due to inadequate cooling caused by degraded thermal paste. Use diagnostic tools to check for overheating issues, and consider reapplying thermal paste as part of your troubleshooting process. Tools such as MemTest86 for memory and Prime95 for CPU stress testing can help diagnose heat-related stability issues. Promptly addressing these symptoms can prevent potential damage to components and ensure stable system performance.
Applying thermal paste correctly ensures efficient heat transfer and optimal performance of electronic components. The goal is to create a thin, even layer of thermal paste that fills the microscopic gaps between the heat sink and the component, preventing air pockets that could interfere with thermal conductivity.
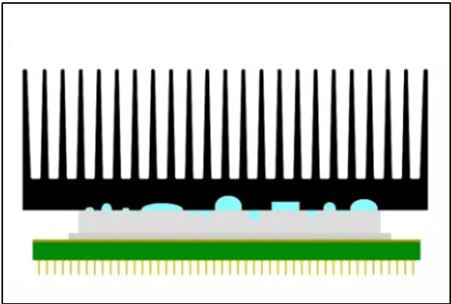
Figure 4: Figure Shows the Microscopic Gaps
The dot method is one of the simplest techniques for applying thermal paste. Place a small dot of thermal paste in the center of the component. The size of the dot can vary, but it is generally about the size of a pea or a grain of rice.
Once the dot is applied, carefully press the heat sink down onto the component. Apply even pressure to avoid tilting the heat sink, which could cause uneven spread and air gaps. As the heat sink presses down, the paste spreads outward, filling the microscopic gaps and creating a uniform layer. Ensure the paste fills the gaps and forms a continuous thermal interface.
Figure 5: Dot Method
The dot method is easy to execute and requires minimal precision, making it popular among both beginners and experienced users. However, ensure the dot is not too large, as excessive thermal paste can lead to spillage and reduced thermal efficiency. After securing the heat sink, check for any excess paste that might have spilled over the edges and clean it if needed.
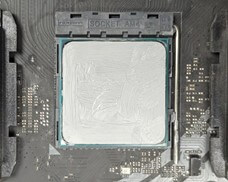
Figure 6: Spread Method
The spread method involves manually spreading a thin, even layer of thermal paste across the entire surface of the component before attaching the heat sink. This method requires more precision and effort compared to the dot method but allows for greater control over the distribution of the thermal paste.
To apply the spread method, start by placing a small amount of thermal paste in the center of the component. Using a plastic spatula, card, or similar tool, spread the paste evenly across the surface. The goal is to create a uniform layer that covers the entire contact area without leaving any gaps or air pockets. Ensure the layer is thin and even, as uneven application can lead to hotspots and reduced thermal performance.
This method is useful for components with irregular surfaces or those requiring precise application. It ensures the entire surface is covered with an even layer of thermal paste, maximizing thermal conductivity. However, it can be more time-consuming and may require practice to achieve the desired results. Patience and steady hands are key to mastering the spread method. Visually check the spread before securing the heat sink.

Figure 7: Line Method
The line method involves applying a thin line of thermal paste down the center of the component. This method is often used for components with rectangular or elongated surfaces, such as certain types of CPUs or GPUs.
To apply the line method, draw a thin line of thermal paste from one end of the component to the other, ensuring the line is straight and evenly distributed. When the heat sink is pressed down onto the component, the thermal paste spreads outwards, filling the gaps and creating a uniform layer. Apply the line with steady pressure to maintain its straightness and evenness.
The line method is relatively easy to execute and provides good coverage, especially for components with elongated shapes. Ensure the line is not too thick, as excessive thermal paste can lead to spillage and reduced efficiency. Once the heat sink is in place, check for even spread by gently pressing and wiggling the heat sink to help the paste distribute evenly. The line method offers a balance between ease of application and effective thermal conductivity, making it a popular choice for many users.
The X method involves applying thermal paste in the shape of an "X" across the surface of the component. This method ensures even distribution of the thermal paste, particularly for components with large or square surfaces.

Figure 8: X Method
To apply the X method, draw two diagonal lines of thermal paste from corner to corner, forming an "X" shape. When the heat sink is pressed down onto the component, the thermal paste spreads outwards from the center, filling the gaps and creating a uniform layer. The X method provides excellent coverage and is effective for larger components that require more extensive application of thermal paste.
Ensure the lines are not too thick, as excessive thermal paste can lead to spillage and reduced efficiency. The X method combines the benefits of the dot and line methods, offering a comprehensive solution for effective thermal conductivity. When applying the heat sink, press firmly and evenly to avoid tilting, and perform a slight twisting motion to help the paste spread out evenly.
Start by gathering all necessary tools and materials: high-quality thermal paste, isopropyl alcohol (90% or higher) for cleaning, lint-free cloths or paper towels, and a plastic scraper or credit card for spreading the paste if needed. An anti-static wrist strap is also essential to prevent static discharge that could damage components. Power down your system and unplug it from the power source. Ground yourself using the anti-static wrist strap or by touching a grounded metal object to avoid static electricity damage.

Figure 9: Figure Shows Thermal Paste Fills the Microscopic Imperfection
Start by carefully removing the heat sink. If it's stuck, gently twist it to break the seal without damaging the CPU or GPU. Soak a lint-free cloth or paper towel in isopropyl alcohol and clean the old thermal paste from the CPU and heat sink surfaces. Make sure to remove all residue, leaving both surfaces clean and dry. Leftover thermal paste will interfere with new applications and reduce thermal conductivity.
Apply a small dot of paste (about the size of a grain of rice or a pea) in the center of the CPU. This method is straightforward and works well for most applications.
Place a small amount of paste in the center of the CPU, then use a plastic scraper or credit card to spread it evenly across the surface. This ensures complete coverage but requires a steady hand to avoid air pockets.
Draw a thin line of paste across the center of the CPU. This method is suitable for elongated surfaces.
Draw an "X" shape on the CPU surface. This ensures the paste spreads evenly across larger surfaces when the heat sink is attached.
Use the chosen method to apply the thermal paste, ensuring the amount is appropriate. Too little paste will leave gaps, while too much can overflow and create a mess.
Align the heat sink with the CPU and place it gently on top, ensuring it is centered. Press down evenly on the heat sink to spread the thermal paste uniformly across the CPU surface. Avoid tilting or shifting the heat sink to prevent air pockets. Secure the heat sink with the appropriate mounting mechanism, following the manufacturer’s instructions to ensure optimal pressure distribution. This step is key to maintaining an even layer of thermal paste and ensuring effective heat transfer.
After attaching the heat sink, inspect the edges of the CPU for any excess thermal paste that might have squeezed out. Clean up any overflow with a lint-free cloth and isopropyl alcohol to prevent potential short circuits. Power on the system and use hardware monitoring software to check the temperatures of your components. Ensure that the temperatures are stable and within the expected range. Run stress tests to confirm the effectiveness of the thermal paste application and to ensure that the system remains stable under load. Monitoring the temperatures and system stability verifies that the thermal paste has been applied correctly and is functioning as intended.
For optimal application, always use a consistent amount of paste; both too much and too little can be detrimental. Invest in high-quality thermal paste, as it can significantly impact thermal performance. Reapply thermal paste every few years, or more frequently if you notice signs of degradation or if you are using the system in high-performance scenarios. Ensure that both the CPU and heat sink surfaces are free from dust, oil, and other contaminants before applying the paste. By following these best practices, you can ensure efficient heat transfer, maintain optimal operating temperatures, and extend the lifespan of your electronic components.
Applying thermal paste is a critical step to ensure efficient heat transfer and optimal performance of electronic components. The process may seem simple, but a few common mistakes can severely impact thermal conductivity and overall system performance.
Excessive thermal paste creates a thick layer of paste that acts more like an insulator than a conductor, trapping heat instead of dissipating it. If too much thermal paste is applied, it will often overflow the edges of components and heat sinks, posing a risk of short circuits if the paste is conductive.
Apply a thin, even layer of thermal paste to fill in tiny gaps without overflowing. A small amount (about the size of a pea or grain of rice) is usually sufficient. This small dot ensures that the thermal paste is evenly distributed under the pressure of the heat sink, creating an efficient thermal interface. Refer to the manufacturer's recommendations to determine the appropriate amount of thermal paste to use. Over-application not only reduces efficiency, but also requires additional cleaning during future maintenance.
Insufficient thermal paste may not adequately cover the entire surface, leaving gaps that can cause hot spots and reduced thermal efficiency. Likewise, uneven application can result in poor contact between the component and the heat sink, resulting in uneven heat distribution.
Ensure that the thermal paste is evenly distributed across the entire contact area. Techniques such as dotting, smearing, beading, or X-coating can help achieve an even coating. The goal is to create a continuous film that covers all desired surfaces without air pockets. Precision and care during application ensure that the thermal paste forms a complete seal, improving thermal transfer and component life.
Residual old thermal paste can create an uneven surface, reduce the effectiveness of the new thermal paste, and hinder heat transfer.
Thoroughly clean the component and heat sink using isopropyl alcohol and a lint-free cloth or paper towel. This process removes all remnants of the old thermal paste as well as any dust or oil, providing a clean surface for the new thermal paste to adhere to. Proper cleaning ensures that new thermal paste adheres well and works effectively, maximizing thermal conductivity.
Dust, oil, and other contaminants can create a barrier between the thermal paste and the surface, preventing effective heat transfer.
Ensure that both the component and heat sink are clean and free of any contaminants. Use a clean, lint-free cloth and isopropyl alcohol to wipe the surface to remove any dust or oil. A clean surface ensures that the thermal paste can fill all microscopic imperfections, creating a seamless thermal interface.
Proper pressure distribution helps ensure that the thermal paste is evenly distributed and fills all gaps between the component and the heat sink. Failure to apply even pressure when securing the heat sink will result in uneven distribution of the thermal paste, resulting in poor thermal performance.
When installing the heat sink, apply firm and even pressure to ensure that the thermal paste is evenly distributed. Avoid applying pressure to only one side or corner, as this can create air pockets and reduce the effectiveness of the thermal interface. Using a slight twisting motion can also help to more evenly distribute the thermal paste. The constant pressure ensures that the thermal paste forms a thin, even layer, which improves thermal conductivity.
Each type of thermal paste may have specific application instructions from the manufacturer. Ignoring these recommendations can result in a poor application and reduced thermal performance.
Always read and follow the instructions that come with the thermal paste, including the recommended application method and amount of thermal paste to use. Manufacturers test their products extensively and provide guidelines to ensure optimal performance. Following these recommendations can help achieve the best results and avoid common application errors. Following the manufacturer's instructions ensures that you get the most out of your thermal paste and maximize its thermal performance.
Thermal paste is important for efficient heat transfer in electronic devices, but its environmental impact and proper storage must also be considered to ensure safe and sustainable use. Understanding these aspects can help users minimize negative impacts and extend the shelf life of thermal paste products.
Thermal pastes are made from various materials, including metals, ceramics, silicones, and carbon compounds. Metal-based pastes contain fine metal particles like silver, aluminum, or gallium in liquid metal pastes. These metals, especially in high-performance and liquid metal variants, can pose environmental hazards if not disposed of properly. Ceramic-based pastes often use compounds like zinc oxide or aluminum oxide, which, while less hazardous, still require careful handling. Silicone-based and carbon-based pastes generally pose fewer environmental risks, but their production and disposal need to be managed responsibly.
Improper disposal of thermal paste can lead to environmental contamination. Metal particles can leach into the soil and water, posing risks to ecosystems and human health. Users should follow local regulations for disposing of electronic waste, including thermal paste. Specialized recycling centers can handle these materials safely. Packaging materials should also be disposed of or recycled properly to reduce environmental impact. Users can minimize waste by choosing thermal pastes from manufacturers who prioritize environmentally friendly practices, such as using recycled materials in their packaging or offering refills.
Some companies now offer eco-friendly thermal pastes made from sustainable materials, reducing the overall environmental footprint. Choosing products from these manufacturers can significantly reduce environmental impact. Consider the entire lifecycle of the product, from production to disposal, and select options that align with sustainable practices. This includes opting for pastes that use less harmful chemicals and prioritizing products with biodegradable or recyclable packaging.
Store thermal paste in a cool, dry place. Extreme temperatures and high humidity can degrade the paste, affecting its performance. Avoid storing thermal paste in areas with significant temperature fluctuations. Ideal storage temperatures typically range from 15°C to 25°C (59°F to 77°F). A climate-controlled environment can prevent the paste from drying out or separating, which is especially important for liquid metal pastes that are more sensitive to temperature changes.
Always ensure the cap or lid of the thermal paste tube is tightly sealed after each use. Exposure to air can cause the paste to dry out, reducing its effectiveness. If the original packaging is compromised, transfer the thermal paste to an airtight container to prevent contamination and moisture ingress. This practice is particularly important for pastes prone to drying out, such as silicone-based varieties.
Thermal paste has a limited shelf life, which is usually stated on the packaging by the manufacturer. It is important to use the paste within this period to ensure optimal performance. Check the consistency and appearance of the paste before use. If it appears dry, separated, or discolored, it is best to replace it with fresh paste. Regular inspection of the thermal paste can prevent potential performance issues in critical components.
Keep track of purchase dates and batch numbers of thermal pastes, especially if you have multiple types or brands in use. This helps ensure you use older stock first and maintain a rotation system. Label containers with the date of purchase and any relevant expiration information to easily identify when the paste needs to be replaced. This practice helps in managing inventory efficiently and prevents the use of expired products that could compromise thermal performance.
When handling thermal paste, wear gloves to prevent skin contact, especially with metal-based or liquid metal pastes, which can be toxic or cause skin irritation. Clean tools and surfaces thoroughly after use to prevent cross-contamination and ensure a clean working environment. Proper handling ensures safety and maintains the integrity of the thermal paste. Using dedicated tools for application can also prevent contamination and ensure more precise application.
Thermal paste plays a key role in the effective transfer of heat between electronic components and heat sinks. Two key properties that affect their performance are viscosity and spreadability. These properties determine how easily the paste is applied and how well it fills tiny gaps between surfaces to ensure optimal thermal conductivity. Understanding these properties helps select the right paste for a specific application and ensures efficient thermal management.
Viscosity measures the resistance of a fluid to flow, indicating how thick or thin the paste is. This property affects application and performance.
These pastes are thick and are particularly well suited for components that move the least, such as desktop CPUs or GPUs. Their consistency ensures that they stay in place, providing excellent long-term stability. High viscosity pastes are ideal for filling significant gaps caused by surface imperfections. They are less likely to pump out during thermal cycling, resulting in consistent thermal performance. However, they are difficult to spread evenly across a surface, requiring more effort during application. Achieving a thin, even coating is key to achieving effective thermal conductivity. Despite the effort required, their stability and reliability make them a top choice for many desktop and GPU applications.
These pastes are thinner and flow more easily, spreading quickly and evenly under pressure. They excel at filling the smallest gaps between surfaces, ensuring efficient heat transfer. Low viscosity pastes are ideal for applications that require precise, thin layers, such as high-performance computing or compact devices like laptops. They are easy to apply on smooth, flat surfaces, making them an attractive option for users who need to achieve full coverage with minimal effort. Their ability to spread evenly reduces the risk of cavitation, improving thermal conductivity and overall system performance.
Spreadability is how easily a thermal paste is distributed across a surface. It is closely related to viscosity, but is also affected by the paste formulation and application method.
Smaller, spherical particles generally enhance spreadability, allowing the thermal paste to flow more smoothly across a surface.
Silicone-based thermal pastes generally have better spreadability than metal-based ones due to their inherent flexibility and lower viscosity.
Most thermal pastes become easier to spread as they warm up. If thermal paste is stored in a cool environment, allowing it to reach room temperature before use can improve its spreadability.
Together, these factors determine how well the thermal paste should be spread to achieve optimal thermal conductivity. By understanding and considering viscosity and spreadability, users can ensure they are selecting and applying the best thermal paste for their specific needs.
Type | Viscosity Level | Spreadability | Application Technique |
Metal-Based Thermal Paste | High | Moderate | Dot, Spread |
Ceramic-Based Thermal Paste | Moderate | High | Dot, Spread, Line |
Silicone-Based Thermal Paste | Low to Moderate | High | Dot, Spread |
Carbon-Based Thermal Paste | Moderate | Moderate to High | Dot, Spread, Line, X |
Liquid-Metal Thermal Paste | Low | Very High | Spread |
Chart 2: Thermal Paste Viscosity, Speadablity and Application Technique
Fourier's Law of Heat Conduction is key to understanding how thermal paste enhances heat transfer between two surfaces. The law states that the rate of heat transfer through a material is proportional to the negative gradient of temperature and the area through which the heat flows.
Thermal paste improves heat transfer by filling tiny gaps and imperfections between the heat generating component (such as a CPU) and the heat sink surface. These gaps, if not filled, act as thermal insulators due to the presence of air, which has a low thermal conductivity. By applying thermal paste, the thermal interface resistance is reduced, resulting in more efficient heat transfer.
You have a CPU and a heat sink, and you are using thermal paste to improve heat transfer between them. The thermal conductivity (k) of the thermal paste is 5 W/m·K. The contact area (A) between the CPU and the heat sink is 0.001 m². The temperature gradient dT/dx across the thermal paste is 10 K/m.
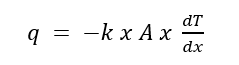
(q) is the rate of heat transfer (W)
(k) is the thermal conductivity of the material (W/m·K).
(A) is the cross-sectional area over which the heat is transferred (m²)
(dT/dx) is the temperature gradient (K/m)
q = -5 W/mK x 0.001m² x 10K/m
q = -5 x 0.001 x 10
q = -0.05W
Since the negative sign indicates the direction of heat flow, we can ignore it to calculate the magnitude of the heat transfer. Therefore, the heat transfer rate (q) is 0.05 W.
This means that, given the thermal paste, an area of 0.001 m², and a temperature gradient of 10 K/m, the thermal paste can transfer 0.05 Watts of heat from the CPU to the heat sink. This simple example illustrates how Fourier's law can be used to quantify the effectiveness of a thermal paste in conducting heat away from a heat-generating component.
Thermal interface resistance: Thermal interface resistance (Rth) measures the resistance to heat flow at the interface of two materials. It is affected by surface roughness, contact pressure, and the thermal properties of the interface material (thermal paste).
By minimizing thermal interface resistance, thermal paste improves the overall heat transfer coefficient, thereby increasing the cooling efficiency of electronic components.
You have a CPU and a heat sink with a contact area (A) of 0.002 m². The thermal transfer coefficient (h) of the thermal paste used is 2000 W/m²·K. We want to calculate the thermal interface resistance (Rth).
(Rth) = (1 )/hxA
(Rth) is the thermal interface resistance (K/W).
(h) is the heat transfer coefficient (W/m²·K).
(A) is the contact area (m²).
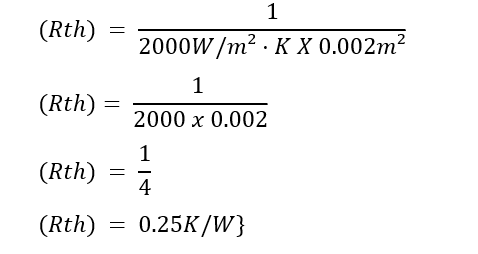
The thermal interface resistance (Rth) is 0.25 K/W. This means that for every watt of heat transferred through the interface between the CPU and the heat sink, there is a temperature difference of 0.25 K due to the thermal resistance of the thermal paste. The lower the thermal interface resistance, the more efficient the heat transfer, helping to keep the temperature of electronic components lower.
Testing the thermal resistance of thermal paste involves both steady-state and transient methods. These tests are important in determining the effectiveness of thermal paste in real-world applications.
The steady-state method measures thermal resistance once the system has reached thermal equilibrium. The ASTM D5470 standard test method involves sandwiching the thermal paste between two heated plates and measuring the temperature difference and heat flow through the thermal paste. The procedure involves applying the thermal paste between two metal plates heated to a constant temperature and measuring the temperature difference across the thermal paste using a thermocouple. Ensuring an even layer of thermal paste with no air gaps and applying constant pressure to replicate operating conditions are key steps in this method.
The transient method measures the thermal response of the system over time. The transient plane source (TPS) method involves using a sensor that acts as both a heat source and a temperature sensor in contact with the thermal paste. Constant power is supplied to the sensor and the temperature rise is recorded over time, which requires precise timing and control. Thermal conductivity and resistance are derived from the temperature-time data, involving complex calculations to isolate the thermal properties of the thermal paste from those of the sensor and surrounding environment.
Thermal paste plays a key role in enhancing heat transfer and maintaining the performance and longevity of electronic components. By filling microscopic gaps, it ensures efficient heat dissipation, preventing overheating and thermal throttling. Different types of thermal paste—metal-based, ceramic-based, silicone-based, carbon-based, and liquid metal—offer various thermal conductivities and application methods suited to specific needs.
Recognizing signs of thermal paste degradation is important. Symptoms, like increased operating temperatures, thermal throttling, and visual signs of paste deterioration, can indicate it's time to reapply. Correct application techniques, such as the dot, spread, line, or X method, ensure maximum thermal conductivity.
Environmental considerations and proper storage are also essential. Choose eco-friendly thermal pastes and dispose of old paste properly. Store paste in a cool, dry place, and ensure it’s sealed tightly to maintain its effectiveness.
By following best practices and avoiding common mistakes, users can achieve optimal thermal performance, extending the lifespan and reliability of their electronic components.

 FPGA / CPLD
 Memory
 MOS
MOS  MCU
MCU  DSP
DSP OCEP
OCEP Secondary
  Other
Other